Using ABBYY FlexiCapture
Introduction
You've bought ABBYY FlexiCapture, and you're keen to understand how you can best use it within your business. If that's your scenario, you've found the right guide. FlexiCapture is a product with lots of functionality and it's key to take in all the learning that will be provided to you by Spectrum during your automation journey. Likely, you've bought FlexiCapture to augment a major part of your business and it's absolutely crucial that you use it as efficiently as possible. The guide will be split into a few major parts which you can flick through using the above Table of Contents. As always, we're listening to you and if there's anything you think that's missing, please contact us so that we can best assist you and get the knowledge added into this constantly evolving guide.
Capture Concepts
The goal of capture is to process as many documents with as much data as possible in an automated fashion. This reduces discrepancies, improves data efficiency and minimises workload. The core thing to remember is the 100% capture of every single document is not always possible. When capturing data there are several factors that could cause an issue:
- Poor quality scanned image
- Not all the pages are present (key data is not present)
- Purchase Order data missing or incomplete (when using line items or header level validation)
- Suppler details not up to date or complete (i.e. missing VAT reg numbers)
- Incorrect data supplied (i.e. No PO number present, incorrect reference used etc.)
In addition to capture, the verify software will assist you in quickly identifying and rectifying issues, or where required identifying a failed document and allowing you to move on without hold ups.
Best Practice
When issues do occur, firstly check whether this issue is data or quality related and can it be quickly resolved? Secondly, is it the first time the issue has arisen, is it the only example out of a larger batch? Or is this a reoccurring issue present on all versions of the document. A key thing to remember; if an invoice for a supplier normally recognises without issue, don’t immediately raise an issue. This should be easily resolved and will likely be an exception to the rule.
When to Escalate
The aim of this document is to provide guidance on how best to use the Capture Software and handle issues should they occur, if you are unable to resolve these issues, our support team may be able to assist, or if you are still in the testing stage of the project, please contact your relevant project contact. Please be aware that it may not be possible to capture every piece of information from every layout of document automatically, even with training.
Opening the Verification Station
- Open the Verification Station via the start menu.
- Select the image of the folder with a world inside it to open a project from the server.
- Input the customer's URL and tenant name:
- URL: https://europe.flexicapture.com
- Tenant: spectrum
- Click 'Connection Settings' and Input the user account (if you are installing this for another person, be sure to use theirs).
- Click 'OK' twice, then open the relevant project.
Navigation
How can I change to the 'Batches' / 'Queues' view?
When processing invoices, there are two views available to the user. Batch view allows users to see a detailed list of each available batch in the system and this can be adjusted to show all batches, only those which require processing, etc. This makes it the superior view for finding and processing specific batches from certain suppliers. The alternative is queue view and this is a simplified view which shows the two queues available to a user which are (by default) 'Exceptions' and 'Verification'. Double-clicking one of these options will take a user into the next document to be processed and keep doing so until all batches are processed. We would recommend 'Queues' view as it allows for faster processing and is much easier to use. It is not required to 'Get Task' in 'Queues' view and you are less likely to struggle with half-processed batches.
The view can be changed as below:
- Select 'View' along the navigation bar.
- Select 'Batches' / 'Queues' to enter the correct view.
However, Spectrum would recommend the following:
- Select 'View' along the navigation bar.
- Select 'Queues' to enter the queue view.
- Right-click the 'Verification' queue.
- Select 'Explore Queue'.
The benefit of the Spectrum recommended solution is that FlexiCapture won't offer half-processed batches to you and you still get the additional information as you do in the batch view.
What filters are available in the 'Batches' view?
Although we recommend using the 'Queues' view, the 'Batches' view does still have benefits such as filtering and sorting:
The main available options are detailed below:
- All batches except processed: This filter will show the user all batches currently in the system which have not yet been processed and exported.
- Batches on stages…: This filter will show the user all batches on the selected stages. The stages selected can be changed using the [...] button which appears next to the filter.
- Batch with ID...: This filter will show the user the single batch with the Id specified by the user. This is commonly used by Spectrum to diagnose batches identified by customers.
There are other options available which we hope are sufficiently self-explanatory, but feel free to explore!
How can I claim a batch?
This section is irrelevant when working with the 'Queues' view. When working with the 'Batches' view though, users will need to 'Get Task' to claim that batch for processing. This is essentially telling the system that you'll be the one to make changes to that batch for a period of time and to disallow others from entering that batch (preventing conflicting changes):
- Select 'View' along the navigation bar.
- Select 'Batches' to enter the batch view.
- Select 'Get Task' above the filter menu (see below).
How can I delete documents and batches?
When processing batches through the system, you may notice documents which shouldn't be processed by FlexiCapture. If you're working with an 'Invoices' project for example, this may be a 'Statement', 'Delivery Note', or some other financial document. Whether these are supplementary documents which came through with an invoice or completely separate documents which find themselves in individual batches, you can delete them from FlexiCapture easily.
- Open a batch and ensure you have claimed the task.
- Select the document you wish to delete, ensuring it is highlighted (double-click the document to view it and confirm it's correct!).
- Select the red 'X' just underneath the navigation bar (should be under the 'Recognition' option, image below).
Deleting all documents against a batch will delete that batch automatically. For batches, you can also:
- Select 'View' along the navigation bar.
- Select 'Batches' to enter the batch view.
- Right-click the batch you wish to delete.
- Select 'Delete'.
The above doesn't require you get the task and allows you to bulk-delete batches which you know to be incorrect (or even all batches if required).
How can I merge and split documents?
Much like the occasional document appearing that will need deletion, there will also sometimes be the need to merge or split documents. This can be due to multiple pages appearing in one captured document or multiple page document being scanned using single page separation. To merge multiple documents into one select the documents you want to merge by clicking each document in turn while holding shift. After all documents are selected right click any of the documents and select merge. Now the document will say incorrect order to fix this you will need to remove the current verification and reapply it to do this right click the newly created document and select clear analytical results once this has finished it will say unprocessed document. Now right click this document and click recognise. To split the pages, open the document and select the pages you want to split by clicking each document in turn while holding shift. Then open up the document you want to move these pages to and drag the pages into the new document. If you want to create an entirely new document drag the pages to the bottom of the batch to create a new document.
Verification
What are the different sections of the 'Verification' view?
- This is the invoice currently being processed.
- This is the data being extracted from the document the data in here is what will be transferred to Therefore relating to this invoice.
- These are rule violations and warning which need to be solved before processing the invoice further on.
How can I capture data regions from a document?
There are three ways to add data into a field:
- Select the box you want to add data to then when you hover over the document it will highlight the text.
- Another option is to drag over the area to select the correct data.
- You can also type in the correct data However the system will not learn where the correct area is so only use this as a last resort.

If a value has been mis-typed but is still in the correct area highlight the incorrect value and then type over it as this will allow for training to take process even with incorrect values.
How can I specify the Business Unit / Vendor where not found automatically?
If the business unit or vendor has been incorrectly found or not found, it can be selected from the database:
- Press 'Find'.
- Search for the company in the text box.
- When you have found the correct company select it by clicking the box in the left section.
- Once the correct vendor or business unit has been selected then click the select button.
Creating New Lines
- Highlight the entire line you want to capture by clicking and dragging over it.
- Once the line has been created select the correct details by selecting the box and then click or highlighting the are you are wanting to capture.
- If the line is order-related, it will need an Id associated against it to do this select the three dots (…)
- Select the correct line.
Multiple lines
If a document has multiple lines you can set one line and then FlexiCapture can continue the line items below:
- Create a line as seen above.
- Right-click the selected area.
- Select 'Continue Line Items'.
Checking the Purchase Order Lines
You can check what lines are associated with a particular purchase order by pressing the details button to bring up a list of all line items.
Rule Violation
Structure of an error message:
- This is the flag which indicates what type of rule violation it is.
- These are all the fields affected by the rule violation.
- This is a description of the error.
Error Types
Red Flags: These need to be corrected before the document can be processed further (the invoice number was not captured).
Yellow Flags: These don’t need to be changed to allow the document to continue on in the workflow but are flagged to you (the quantity of line didn’t match the quantity of the purchase order).
Validation Errors
These are different to flag errors as it is the system letting you know that it might of captured a value incorrectly this could be due to poor quality of the document. To resolve this correct the incorrect text or if it is correct click into the box area and then click enter.
Resolving Rule Violation
Once all red flag errors have been resolved and all yellow flag warnings have been checked in the entire batch. The batch can be continued on through the workflow.
How can I add comments against batches?
When processing batches, you might find an issue which you can't solve (yet). In this case, it might make sense to leave a comment against the invoice(s) for later processing:
- Right-click the batch in the 'Batches' view.
- Select 'Properties'.
- Select the 'General' tab (if not pre-selected).
- Type a comment into the 'Description' field.
As you can see above, this improves visibility for the rest of the team and ensures they don't enter batches which can't yet be processed.
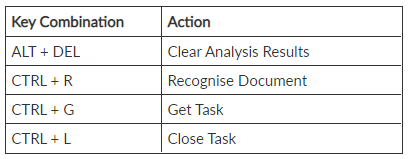
Keyboard Shortcuts
Something Missing?
If you've had a good look through the guide and still can't seem to find what you're looking for, no worries; get in touch with us and let us know so we can assist with the matter and get the knowledge added into this evolving guide. We're here to help and we want to be sure you can get the most use possible out of ABBYY FlexiCapture.
Related Articles
Installing Abbyy Flexicapture (Standalone Edition)
Installing the Abbyy Flexicapture Client This guide will guide you or your IT team through the installation process for the Flexicapture software we provide for you. This contains step by step instructions to take you through each stage of the ...Installing Abbyy Flexicapture (Distributed)
Installing the Abbyy Flexicapture Client This guide will guide you or your IT team through the installation process for the Flexicapture software we provide for you. This contains step by step instructions to take you through each stage of the ...Adding Users in Flexicapture (Distributed)
How to add users in Flexicapture This guide will run through the process on creating new users in the Flexicapture system and give them the relevant permissions to access the system. Importing Users To import users into Flexicapture, follow the below ...Importing & Exporting Documents with Abbyy Flexicapture (Standalone Edition)
Importing/Export Documents With Abbyy Flexicapture This guide will provide brief instruction on how to import documents to be checked in the Flexicapture system. There will also be instruction on how to export these files once their information has ...Installing ABBYY FlexiCapture Cloud
Introduction You may find yourself needing to install ABBYY FlexiCapture Cloud. This might be because a new user will be processing invoices through your FlexiCapture system or amending supplier training batches and layouts. Please find below a ...